

How to Replace a Damaged Fuse Clip?
Fuse clips are essential components in electrical circuits, designed to hold fuses securely and ensure proper electrical connections. When a fuse clip becomes damaged, it can compromise the safety and functionality of the circuit. In this blog post, I'll guide you through the process of replacing a damaged fuse clip, sharing insights based on my experience as a fuse clips supplier.
Understanding Fuse Clips
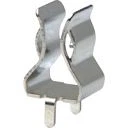
Before diving into the replacement process, it's crucial to understand what fuse clips are and their role in electrical systems. Fuse clips are small, spring - loaded devices that grip fuses firmly in place. They come in various sizes to accommodate different types of fuses, such as Fuse Clips 5.2x20mm and Fuse Clips 6.35x32mm. These clips are typically made of conductive materials like brass or copper, which allow electricity to flow through the fuse and protect the circuit from overcurrent.

Signs of a Damaged Fuse Clip
There are several signs that indicate a fuse clip may be damaged. First, if you notice that the fuse keeps blowing even when there is no apparent overloading in the circuit, it could be due to a faulty fuse clip. A damaged clip may not provide a proper connection, causing the fuse to heat up and blow prematurely. Second, physical damage such as bent or broken prongs, corrosion, or excessive wear on the clip can also be signs of a problem. If you see any visible damage, it's time to replace the fuse clip.
Tools and Materials Needed
To replace a damaged fuse clip, you'll need the following tools and materials: 1. Screwdriver: Depending on the type of mounting, you may need a flat - head or Phillips - head screwdriver to remove the old fuse clip. 2. New Fuse Clip: Make sure to choose a replacement fuse clip that is compatible with the size and type of fuse used in your circuit. You can find a wide range of high - quality fuse clips at our store, including Fuse Clips 5.2x20mm and Fuse Clips 6.35x32mm. 3. Insulated Pliers: These are useful for handling the fuse and the clip safely, especially when working with live circuits. 4. Wire Cutters/Strippers: If you need to make any wire connections, wire cutters and strippers will be necessary.
Step - by - Step Replacement Process
Step 1: Safety First
Before you start working on the electrical circuit, it's essential to ensure your safety. Turn off the power supply to the circuit at the main breaker or fuse box. Use a voltage tester to confirm that there is no electricity flowing through the circuit. This will prevent the risk of electric shock.
Step 2: Locate the Damaged Fuse Clip
Identify the fuse clip that needs to be replaced. In most cases, fuse clips are located in a fuse box or a control panel. They are usually attached to a circuit board or a mounting bracket.
Step 3: Remove the Old Fuse Clip
If the fuse clip is held in place by screws, use the appropriate screwdriver to remove them. Gently pull the old fuse clip away from the circuit board or mounting bracket. If the clip is soldered, you'll need to use a soldering iron to melt the solder and remove the clip. Be careful not to damage the surrounding components during this process.
Step 4: Prepare the New Fuse Clip
Examine the new fuse clip to ensure it is in good condition. If there are any wires attached to the old clip, you may need to transfer them to the new one. Use wire cutters and strippers to remove the insulation from the wire ends, and then attach them to the appropriate terminals on the new fuse clip. Make sure the connections are secure.
Step 5: Install the New Fuse Clip
Position the new fuse clip in the same location as the old one. If it's a screw - mounted clip, insert the screws and tighten them firmly. If it's a soldered clip, use the soldering iron to solder the connections. Double - check that the clip is properly aligned and seated.
Step 6: Test the Circuit
Once the new fuse clip is installed, turn the power supply back on. Insert a new fuse into the clip and check if the circuit is functioning properly. If the fuse blows immediately, there may still be an underlying problem in the circuit, and you should seek further assistance.
Tips for a Successful Replacement
- Choose the Right Fuse Clip: Always select a fuse clip that is compatible with the fuse and the electrical requirements of the circuit. Using an incorrect clip can lead to poor connections and potential safety hazards.
- Handle with Care: When working with electrical components, be gentle to avoid damaging the new fuse clip or other parts of the circuit.
- Keep Spares on Hand: It's a good idea to keep a few spare fuse clips in your toolkit, so you're prepared for any future issues.
Why Choose Our Fuse Clips?
As a trusted fuse clips supplier, we offer a wide range of high - quality fuse clips that are designed to meet the diverse needs of our customers. Our Fuse Clips 5.2x20mm and Fuse Clips 6.35x32mm are made from premium materials, ensuring excellent conductivity and durability. We also provide competitive prices and reliable customer service.
If you're in the market for fuse clips or have any questions about replacing a damaged fuse clip, we encourage you to get in touch with us. Our team of experts is ready to assist you with your procurement needs and provide you with the best solutions for your electrical projects.
References
- Electrical Safety Standards Handbook.
- Fuse and Fuse Holder Manuals from leading manufacturers.